How to deploy a Django app to AWS Elastic Beanstalk
A guide to deploy a Python-Django Application containing stripe integration using DJStripe, to AWS Elastic Beanstalk and setting up RDS and S3

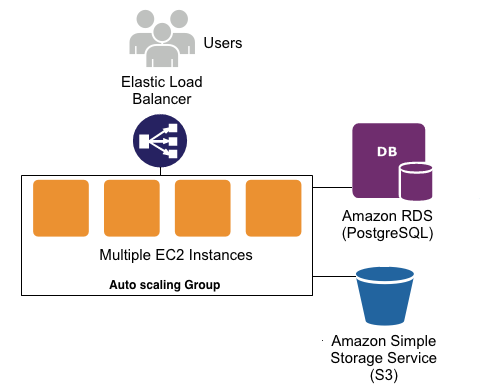
Elastic Beanstalk is a Platform As A Service (PaaS) that streamlines the setup, deployment, and maintenance of an app on Amazon AWS. It’s a managed service, coupling the server (EC2), database (RDS), and static files (S3). You can quickly deploy and manage your application, which automatically scales as your site grows.
Elastic Beanstalk Concepts
An application is a logical collection of Elastic Beanstalk components, including environments, versions, and environment configurations. An application can have multiple versions.
An environment is a collection of AWS resources running an application version.
A platform is a combination of an operating system, programming language runtime, web server, application server, and Elastic Beanstalk components.
CLI for AWS Elastic Beanstalk
The Elastic Beanstalk command line interface (EB CLI) allows us to perform a variety of operations to deploy and manage your Elastic Beanstalk applications and environments.
There are two ways of installing EB CLI:
Via the EB CLI installer
With pip (awsebcli)
It's recommended to install the EB CLI globally (outside any specific virtual environment) using the installer (first option) to avoid possible dependency conflicts.
Note: Make sure you deactivate your local virtualenv and delete the venv (virtual environment) directory from the local code repo before each deployment. Not doing so sometimes pushes the virtual environment directory to the production which can create version issues on production. So, it’s important to delete the virtual environment directory before each deployment.
After you've installed the EB CLI, you can check the version by running:
Now test the installation to make sure it’s working:
$ eb --version
This should show a 3.x version number:
EB CLI 3.20.3 (Python 3.9.1)
Now, we want to create a Beanstalk environment to host the application on. Run this from the project directory (Note: cd into the django app repository before running the command)
$ eb init
This will prompt you with a number of questions to help you configure your environment.
Default Region
The AWS region of your Elastic Beanstalk environment (and resources). If you're not familiar with the different AWS regions, check out AWS Regions and Availability Zones.
Application Name
This is the name of your Elastic Beanstalk application. I recommend just pressing enter and going with the default.
Platform and Platform Branch
The EB CLI will detect that you're using a Python environment. After that, it'll give you different Python versions and Amazon Linux versions you can work with. Pick "Python 3.8 running on 64bit Amazon Linux 2".
CodeCommit
CodeCommit is a secure, highly scalable, managed source control service that hosts private Git repositories. We won't be using it since we're already using GitHub for source control. So say "no".
SSH
To connect to the EC2 instances later we need to set up SSH. Say "yes" when prompted.
Keypair
To connect to EC2 instances, we'll need an RSA keypair. Go ahead and generate one, which will be added to your "~/.ssh" folder.
After you answer all the questions, you'll notice a hidden directory inside your project root named ".elasticbeanstalk". The directory should contain a config.yml file, with all the data you've just provided.
At this point, if you type eb console it will open up your default browser and navigate to the Elastic Beanstalk console. On the page, you should see one application, but no environments.
An application represents your code application and is what eb init created for us. With Elastic Beanstalk, an application can have multiple environments (i.e., development, testing, staging, production). For simple Django applications I like to have the development environment on my laptop, then create a test and a production environment on Beanstalk.
Configure EB – Create an Environment
Note: Make sure you deactivate your local virtualenv and delete the venv (virtual environment) directory from the code repo before every deployment. Not doing so sometimes pushes the venv to production which can create version issues on production. So, it’s important to delete the venv directory before each deployment.
Note: Make sure the requirements.txt file is located at the root of your code repo as it will be ran after deployment to install all the dependencies.
Next, let's create the Elastic Beanstalk environment and deploy the application:
$ eb create
Again, you'll be prompted with a few questions.
Environment Name
This represents the name of the EB environment. I'd recommend sticking with the default.
It's considered good practice to add -env or -dev suffix to your environments so you can easily differentiate EB apps from environments.
DNS CNAME Prefix
Your web application will be accessible at %cname%.%region%.elasticbeanstalk.com. Again, use the default.
Load balancer
A load balancer distributes traffic amongst your environment's instances. Select "application".
Spot Fleet Requests
Spot Fleet requests allow you to launch instances on-demand based on your criteria. We won't be using them staging environment, so say "no".
With that, the environment will be spun up:
Your code will be zipped up and uploaded to a new S3 Bucket.
After that, the various AWS resources will be created, like the load balancer, security and auto-scaling groups, and EC2 instances.
A new application will be deployed as well.
This will take about three minutes.
After the deployment is done, the EB CLI will modify .elasticbeanstalk/config.yml.
Open
$ eb open
This command will open our default browser and navigate to the CNAME domain. You'll see 502 Bad Gateway, which we'll fix.
Console
$ eb console
This command will open the Elastic Beanstalk console in our default browser:
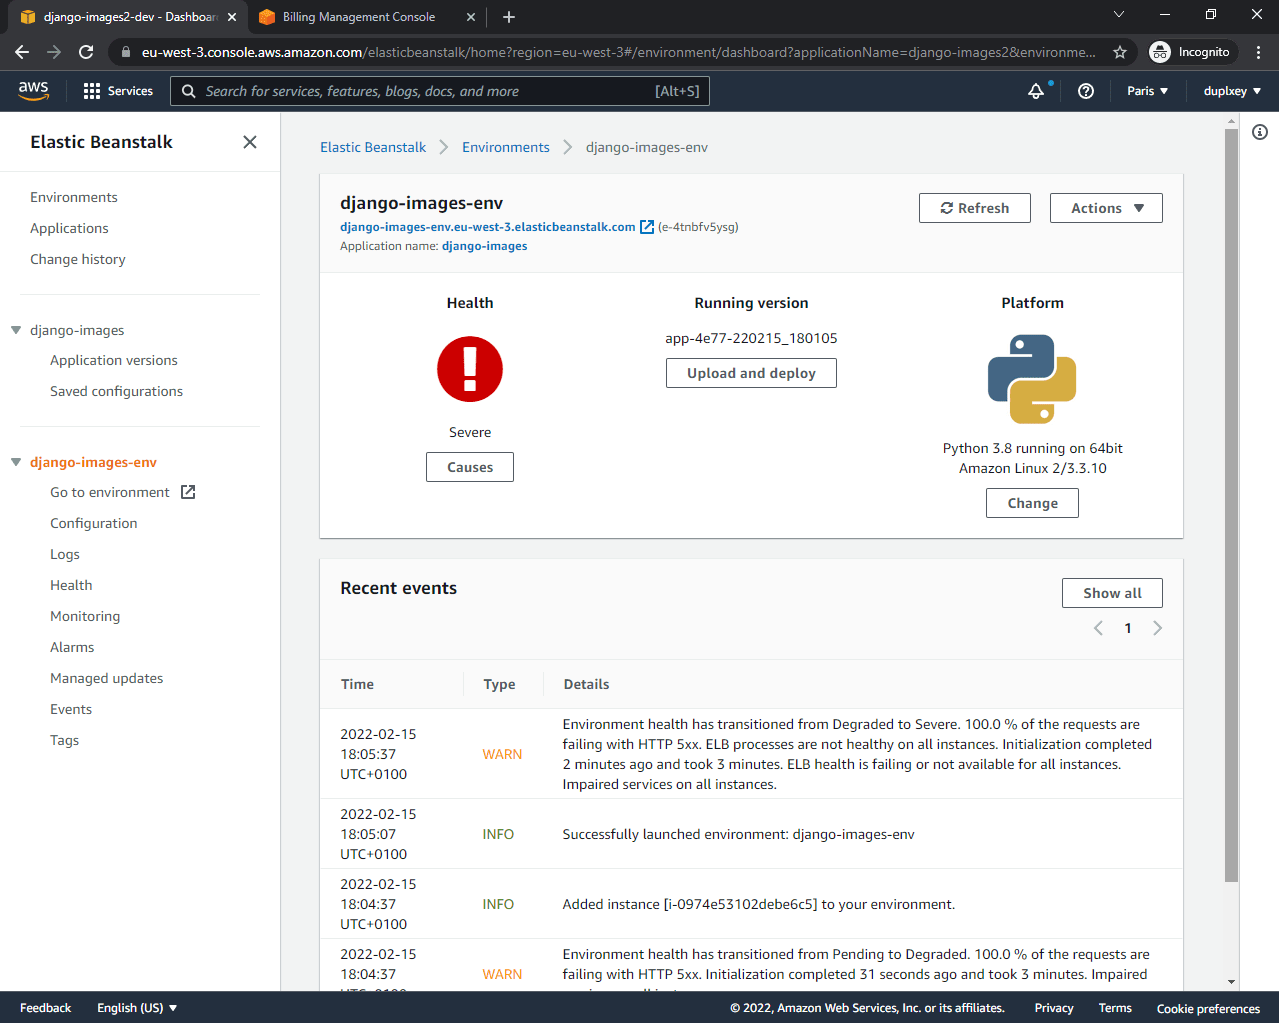
Again, it will show the health of the environment as "Severe", which we'll fix in the next step.
Configure an Environment
In the previous step, we tried accessing our application and it returned 502 Bad Gateway. There are a few reasons behind it:
Python needs
PYTHONPATHin order to find modules in our application.By default, Elastic Beanstalk attempts to launch the WSGI application from application.py, which doesn't exist.
Django needs
DJANGO_SETTINGS_MODULEto know which settings to use.
By default Elastic Beanstalk serves Python applications with Gunicorn. EB automatically installs Gunicorn in the deployment process, hence we do not have to add it to requirements.txt.
Create a new folder in the project root called ".ebextensions". Within the newly created folder create a file named 01_django.config:
# .ebextensions/01_django.config

option_settings:
  aws:elasticbeanstalk:application:environment:
    DJANGO_SETTINGS_MODULE: "PatentApp.settings"
    PYTHONPATH: "/var/app/current:$PYTHONPATH"
  aws:elasticbeanstalk:container:python:
    WSGIPath: "SEOApp.wsgi:application"
Notes:
We set the
PYTHONPATHto the Python path on our EC2 instance.We pointed
DJANGO_SETTINGS_MODULEto our Django settings (docs).We changed the
WSGIPathto our WSGI application (docs).
How do EB .config files work?
You can have as many as you want.
They are loaded in the following order: 01_x, 02_x, 03_x, etc.
We can list all your environmental settings by running
eb config.Note: check out Advanced environment customization with configuration files.
Another thing we have to do before redeploying is to add our CNAME to the ALLOWED_HOSTS in settings.py
# settings.py

ALLOWED_HOSTS = [
    'xyz.elasticbeanstalk.com',  # make sure to replace it with your the generated EB CNAME
]
Note: Alternatively, for testing, we could just use a wildcard: ALLOWED_HOSTS = ['*'].
But for production, we’ll need to change it back.
Commit the changes to git and deploy:
$ git add .
$ git commit -m "updates for eb"

$ eb deploy
Note: For every deployment, EB CLI needs a new commit. It doesn’t have to be pushed to master. But there needs to be a new commit.
Configure RDS
AWS RDS Postgres
To set up Postgres for production, start by running the following command to open the AWS console:
$ eb console
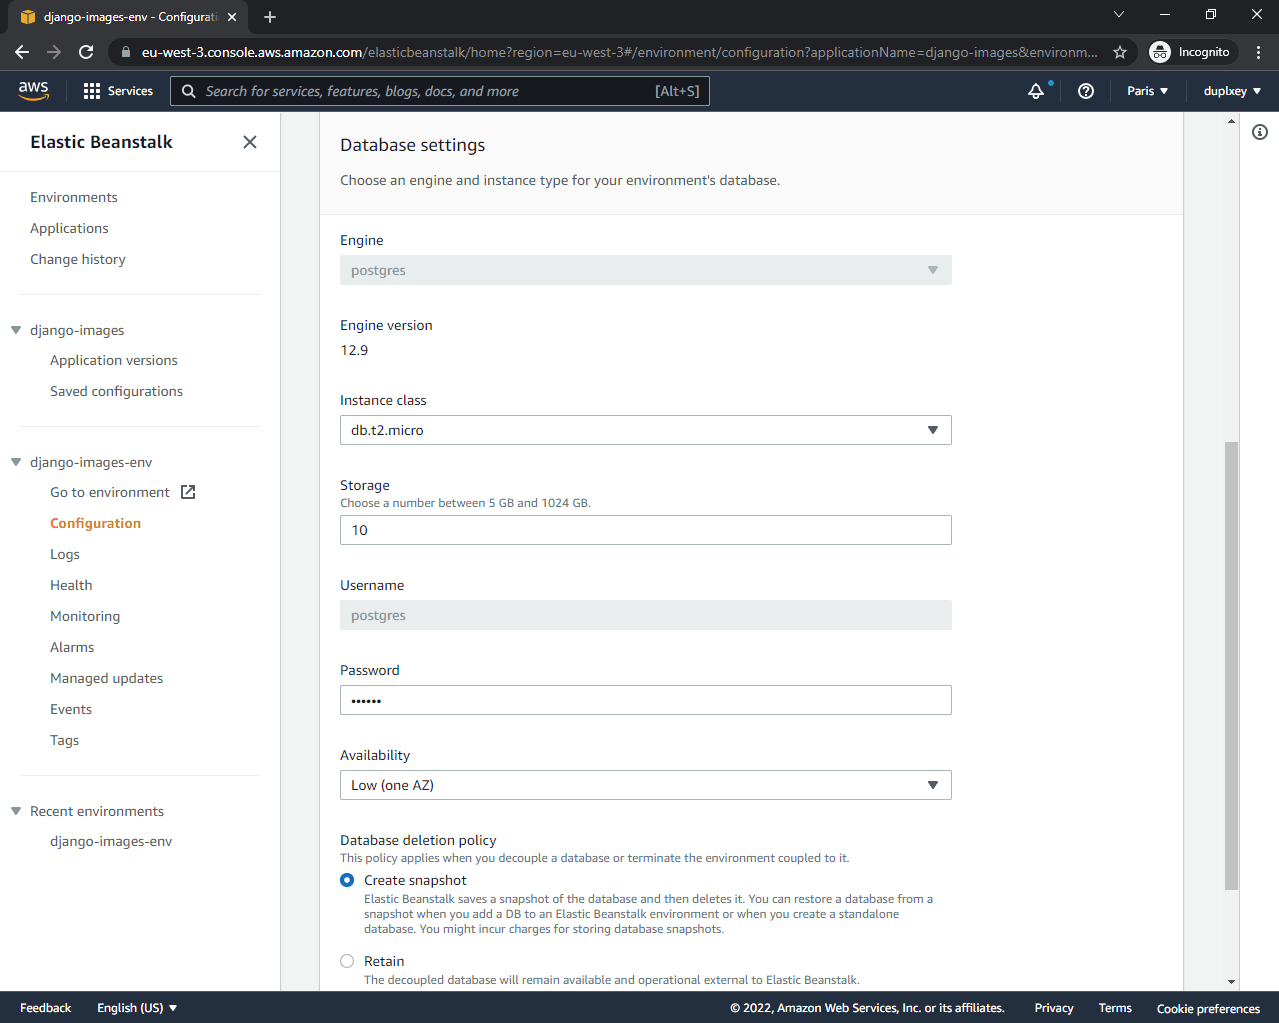
Click "Configuration" on the left side bar, scroll down to "Database", and then click "Edit".
Create a DB with the following settings and click on "Apply":
Engine: postgres
Engine version: 12.9 (older Postgres version since db.t2.micro is not available with 13.1+)
Instance class: db.t2.micro
Storage: 5 GB
Username: pick a username
Password: pick a strong password
Note: If you want to stay within the AWS Free Tier make sure you pick db.t2.micro.
After the environmental update is done, EB will automatically pass the following DB credentials to our Django app:
RDS_DB_NAME
RDS_USERNAME
RDS_PASSWORD
RDS_HOSTNAME
RDS_PORT
We can now use these variables in settings.py to set up the DATABASE:
# settings.py

import os

if 'RDS_DB_NAME' in os.environ:
    DATABASES = {
        'default': {
            'ENGINE': 'django.db.backends.postgresql_psycopg2',
            'NAME': os.environ['RDS_DB_NAME'],
            'USER': os.environ['RDS_USERNAME'],
            'PASSWORD': os.environ['RDS_PASSWORD'],
            'HOST': os.environ['RDS_HOSTNAME'],
            'PORT': os.environ['RDS_PORT'],
        }
    }
else:
    DATABASES = {
        'default': {
            'ENGINE': 'django.db.backends.postgresql_psycopg2',
            'NAME': 'patentapp-local',
            'USER': 'postgres',
            'PASSWORD': 'complexpassword123',
            'HOST': 'localhost',
            'PORT': '5432',
        }
    }
Next, we have to tell Elastic Beanstalk to run makemigrations and migrate when a new application version gets deployed. We can do that by editing the .ebextensions/01_django.config file. Add the following to the bottom of the file:
# .ebextensions/01_django.config

container_commands:
  01_makemigrations:
    command: "source /var/app/venv/*/bin/activate && python3 manage.py makemigrations --noinput"
    leader_only: true
  02_migrate:
    command: "source /var/app/venv/*/bin/activate && python3 manage.py migrate --noinput"
    leader_only: true
The EB environment will now execute the above commands every time we deploy a new application version. We used leader_only, so only the first EC2 instance executes them (in case our EB environment runs multiple EC2 instances).
Note:
Elastic Beanstalk configs support two different command sections, commands and container_commands. The main difference between them is when they are run in the deployment process:
commandsrun before the application and web server are set up and the application version file is extracted.container_commandsrun after the application and web server have been set up and the application version archive has been extracted, but before the application version is deployed (before the files are moved from the staging folder to their final location).
Let's also add a command to create a superuser. We can use Django's intuitive custom command framework to add a new command. Within the local app repository, create the following files and folders:
└-- management
        |-- __init__.py
        └-- commands
            |-- __init__.py
            └-- createsu.py
# management/commands/createsu.py

from django.contrib.auth.models import User
from django.core.management.base import BaseCommand

class Command(BaseCommand):
    help = 'Creates a superuser.'

    def handle(self, *args, **options):
        if not User.objects.filter(username='admin').exists():
            User.objects.create_superuser(
                username='admin',
                password='complexpassword123'
            )
        print('Superuser has been created.')
Next, add the third container command to .ebextensions/01_django.config:
# .ebextensions/01_django.config

container_commands:
  01_makemigrations:
    command: "source /var/app/venv/*/bin/activate && python3 manage.py makemigrations --noinput"
    leader_only: true
  02_migrate:
    command: "source /var/app/venv/*/bin/activate && python3 manage.py migrate --noinput"
    leader_only: true
  # ------------------------------------- new -------------------------------------
  03_superuser:
    command: "source /var/app/venv/*/bin/activate && python3 manage.py createsu"
    leader_only: true
  # --------------------------------- end of new  ---------------------------------
Note: An alternative to creating a createsu command is to SSH into one of the EC2 instances and run Django's default createsuperuser command.
Note: To SSH into the EC2 instance, run the following command from the repo:
eb ssh
Note: The environment variable won’t be available in the ssh shell session after sshing into the instance. So, we’ll need to dump the enviornment variables from the file to the shell.
We’ll need to run the following commands to run any manage.py commands on the server:
$ export $(cat /opt/elasticbeanstalk/deployment/env | xargs)
$ source /var/app/venv/*/bin/activate
$ python3 /var/app/current/manage.py <command name>
Note: The first command is needed to import our environment variables if we have an RDS database connection.
This command exports environment variables stored in the file '/opt/elasticbeanstalk/deployment/env' to the current shell session.
The command is using the cat command to read the content of the file '/opt/elasticbeanstalk/deployment/env' and pass them as input to the xargs command, which in turn splits the input into separate arguments and pass them to the export command.
The effect of this command is that all the environment variables specified in the file '/opt/elasticbeanstalk/deployment/env' are made available for use in the current shell session.
Commit the changes to git and deploy:
$ git add . $ git commit -m "updates for eb"

$ eb deploy
Wait for the deployment to finish. Once done, run eb open to open your app in a new browser tab. Our app should now work.
S3 for File Storage
We’ll use S3 to store static and media files.
To configure S3, we'll need to:
Create an S3 Bucket
Create an IAM group and user for S3 Bucket management
Set Elastic Beanstalk S3 environment variables
Configure Django static and media settings
Create an S3 Bucket
To start, let's create a new S3 Bucket. Navigate to the AWS S3 Console and click on "Create Bucket". Give the Bucket a unique name and set the AWS region. Use the default config for everything else. Press "Create".
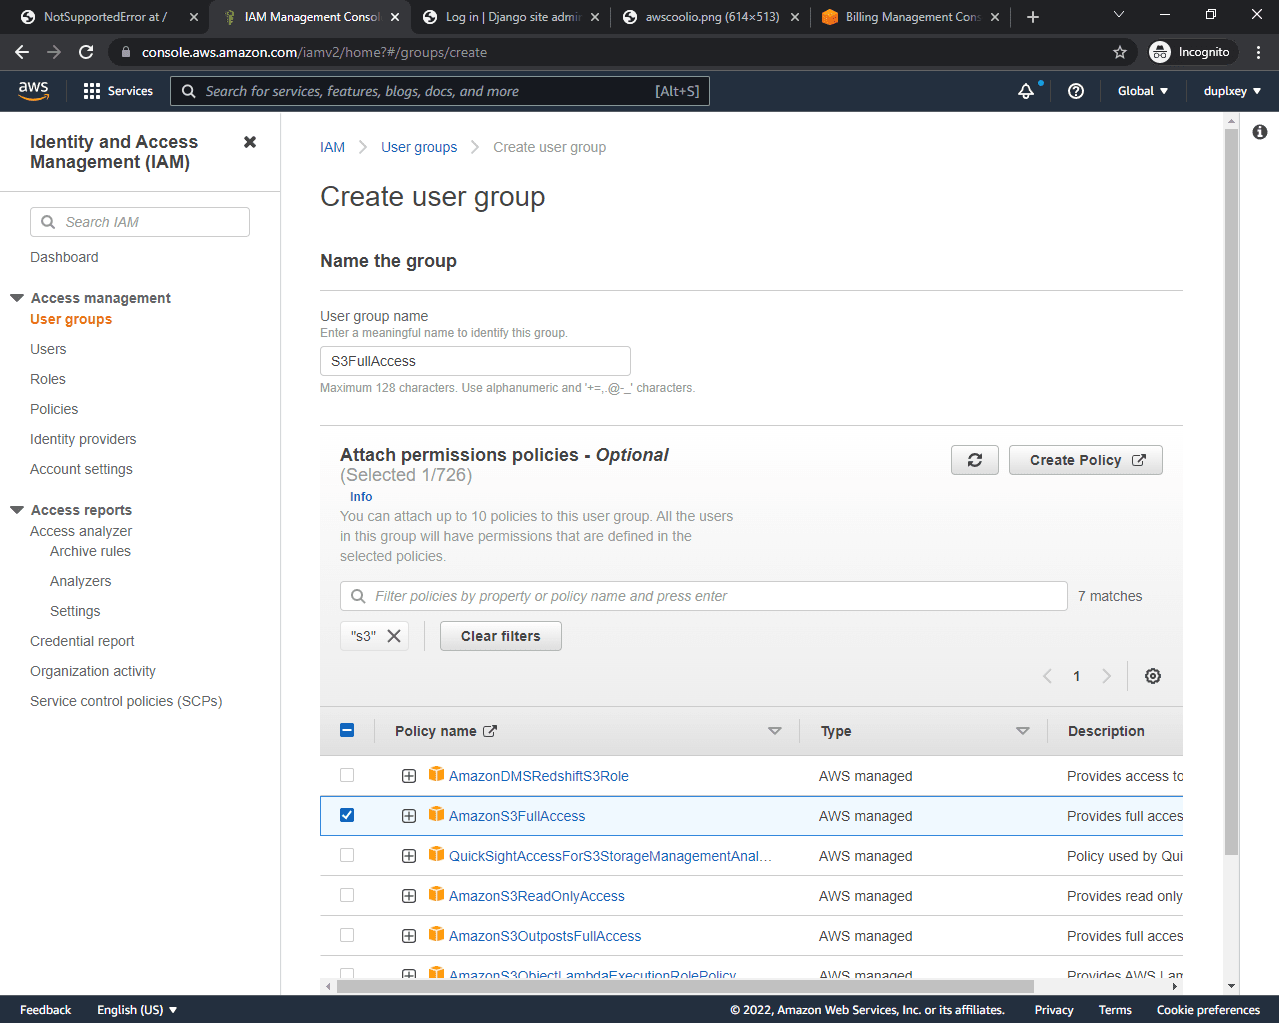
IAM Group and User
Navigate to the IAM Console. On the left side of the screen, select "User groups". Create a new group with the "AmazonS3FullAccess" permission:
Then, create a new user with "Programmatic access" and assign that group to the user:

AWS will generate authentication credentials for you. Download the provided .csv file. We'll need to pass them to our Elastic Beanstalk environment in the next step.
Set EB Environment Variables
Next, we need to set the following environmental variables:
AWS_ACCESS_KEY_ID                - our ACCESS_KEY_ID
AWS_SECRET_ACCESS_KEY            - our SECRET_ACCESS_KEY
AWS_S3_REGION_NAME               - our selected S3 region
AWS_STORAGE_BUCKET_NAME          - our bucket name
Navigate to your Elastic Beanstalk console. Click "Configuration". Then, within the "Software" category, click "Edit" and scroll down to the "Environment properties" section. Add the four variables.
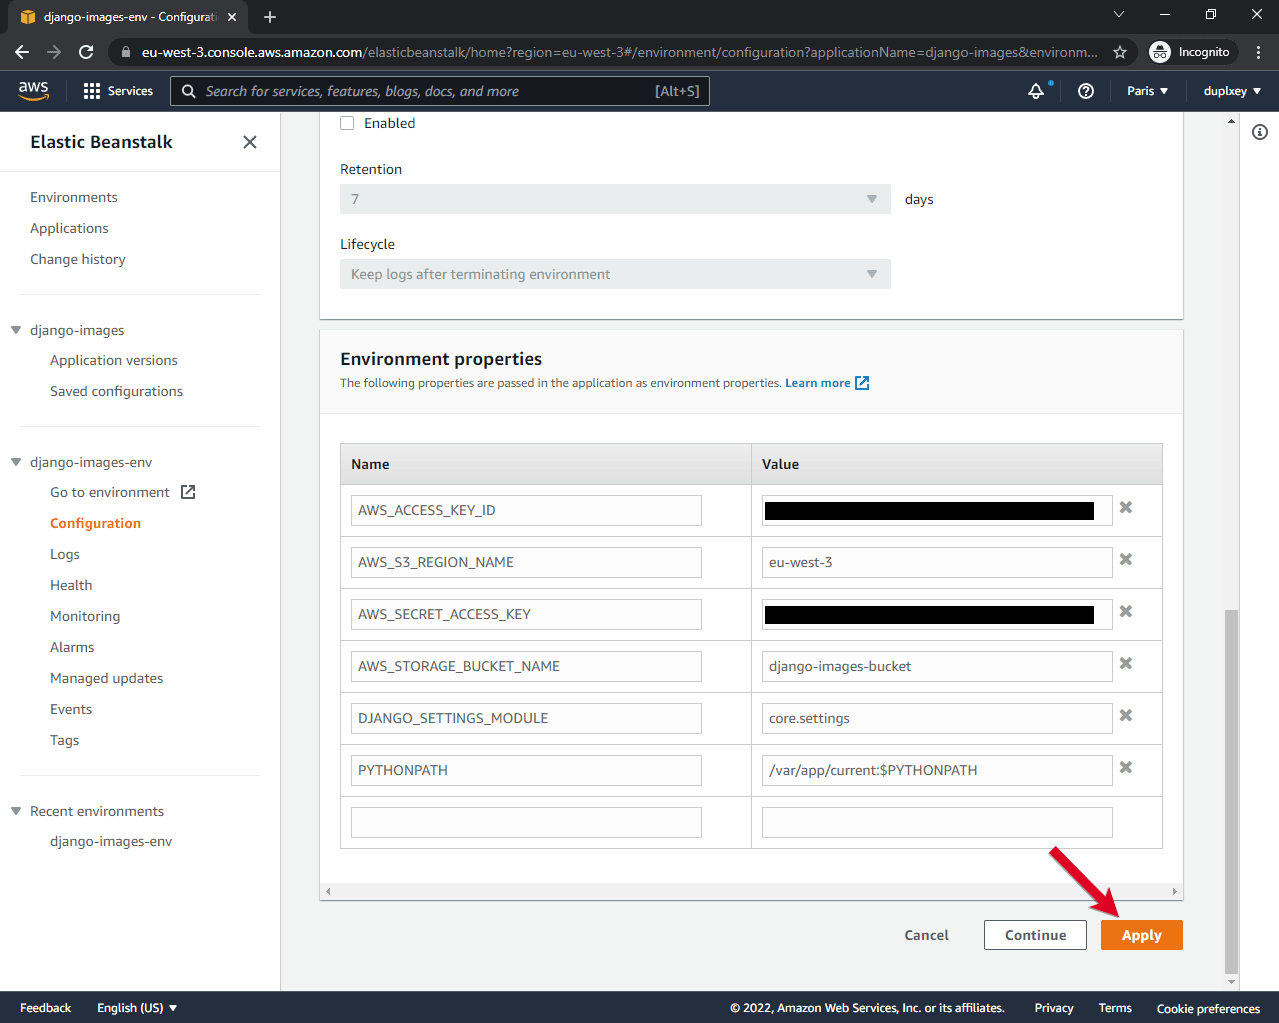
After you've added all the variables click "Apply".
Configure Django Static and Media Settings
Next, in order for Django to communicate with our S3 Bucket, we need to install the django-storages and boto3 packages.
Add them to the requirements.txt file:
Django==4.0.2
Pillow==9.0.1
django-tables2==2.4.1
django-crispy-forms==1.14.0
psycopg2-binary==2.9.3
boto3==1.21.3
django-storages==1.12.3
Next, add the newly installed app to INSTALLED_APPSin settings.py:
# settings.py

INSTALLED_APPS = [
    # ...
    'storages',
]
Configure django-storages to use the environmental variables passed by Elastic Beanstalk:
if 'AWS_STORAGE_BUCKET_NAME' in os.environ:

    DEFAULT_FILE_STORAGE = 'storages.backends.s3boto3.S3Boto3Storage'

    AWS_STORAGE_BUCKET_NAME = os.environ['AWS_STORAGE_BUCKET_NAME']
    AWS_S3_REGION_NAME = os.environ['AWS_S3_REGION_NAME']
    AWS_DEFAULT_ACL = None
    AWS_S3_ACCESS_KEY_ID = os.environ['AWS_ACCESS_KEY_ID']
    AWS_S3_SECRET_ACCESS_KEY = os.environ['AWS_SECRET_ACCESS_KEY']
    AWS_S3_CUSTOM_DOMAIN = f'{AWS_STORAGE_BUCKET_NAME}.s3.amazonaws.com'
    AWS_S3_OBJECT_PARAMETERS = {'CacheControl': 'max-age=86400'}
    # s3 static settings
    STATIC_LOCATION = 'static'
    STATICFILES_STORAGE = 'storages.backends.s3boto3.S3Boto3Storage'
    STATIC_URL = f'https://{AWS_S3_CUSTOM_DOMAIN}/{STATIC_LOCATION}/'
    # s3 public media settings
    PUBLIC_MEDIA_LOCATION = 'media'
    MEDIA_URL = f'https://{AWS_S3_CUSTOM_DOMAIN}/{PUBLIC_MEDIA_LOCATION}/'
    DEFAULT_FILE_STORAGE = 'patentApp.apps.storage.storage_backends.PublicMediaStorage'
else:
    STATIC_URL = '/staticfiles/'
    STATIC_ROOT = os.path.join(BASE_DIR, 'staticfiles')
    MEDIA_URL = '/mediafiles/'
    MEDIA_ROOT = os.path.join(BASE_DIR, 'mediafiles')KEY']
Now create a new app in the code repo called storage
Create a file called storage_backends.py
and write the following classes inside it:
from django.conf import settings
from storages.backends.s3boto3 import S3Boto3Storage

class StaticStorage(S3Boto3Storage):
    location = 'static'
    default_acl = 'public-read'

class PublicMediaStorage(S3Boto3Storage):
    location = 'media'
    default_acl = 'public-read'
    file_overwrite = False
Lastly, we need to run the collectstaticcommand after deployment is complete, so add the following to 01_django.config:
# .ebextensions/01_django.config
# ...

container_commands:
  # ...
  04_collectstatic:
    command: "source /var/app/venv/*/bin/activate && python3 manage.py collectstatic --noinput"
    leader_only: true
The full file should now look like this:
option_settings:
  aws:elasticbeanstalk:application:environment:
    DJANGO_SETTINGS_MODULE: "PatentApp.settings"
    PYTHONPATH: "/var/app/current:$PYTHONPATH"
  aws:elasticbeanstalk:container:python:
    WSGIPath: "SEOApp.wsgi:application"

container_commands:
  01_makemigrations:
    command: "source /var/app/venv/*/bin/activate && python3 manage.py makemigrations --noinput"
    leader_only: true
  02_migrate:
    command: "source /var/app/venv/*/bin/activate && python3 manage.py migrate --noinput"
    leader_only: true
  03_superuser:
    command: "source /var/app/venv/*/bin/activate && python3 manage.py createsu"
    leader_only: true
  04_collectstatic:
    command: "source /var/app/venv/*/bin/activate && python3 manage.py collectstatic --noinput"
    leader_only: true
Commit the changes to git and deploy:
$ git add .
$ git commit -m "updates for eb"

$ eb deploy
Confirm that the static and media files are now stored on S3.
Note:
If you get a Signature mismatch error, you might want to add the following setting to settings.py: AWS_S3_ADDRESSING_STYLE = "virtual". For more details, refer to this GitHub issue.
To learn more about static and media file storage on AWS S3, take a look at the Storing Django Static and Media Files on Amazon S3 article.
Debugging Elastic Beanstalk
There are two ways to access the logs:
Elastic Beanstalk CLI or console
SSH into EC2 instance
Elastic Beanstalk CLI or Console
CLI:
$ eb logs
This command will fetch the last 100 lines from the following files:
/var/log/web.stdout.log
/var/log/eb-hooks.log
/var/log/nginx/access.log
/var/log/nginx/error.log
/var/log/eb-engine.log
Note:
Running eb logs is equivalent to logging into the EB console and navigating to "Logs".
Syncing DJStripe settings with stripe sandbox:
To sync the stripe settings with djstripe in our database. We’ll need to have the stripe credentials added to our settings.py file.
# Stripe settings

# Stripe Keys Staging
STRIPE_TEST_PUBLIC_KEY =''
STRIPE_TEST_SECRET_KEY = ''

STRIPE_LIVE_MODE = False  # Change to True in production

# Local/staging webhook secret
# DJSTRIPE_WEBHOOK_SECRET = "whsec_04801fcfe20db6ffa904b04c12c9fe7d0fc423751ae52673841fc8d25daeb81e"

DJSTRIPE_FOREIGN_KEY_TO_FIELD = "id"
We’ll also need to make sure djstripe migrations have been run.
Add the following commands to 01_django.config:
option_settings:
  aws:elasticbeanstalk:application:environment:
    DJANGO_SETTINGS_MODULE: "PatentApp.settings"
    PYTHONPATH: "/var/app/current:$PYTHONPATH"
  aws:elasticbeanstalk:container:python:
    WSGIPath: "SEOApp.wsgi:application"

container_commands:
  01_makemigrations:
    command: "source /var/app/venv/*/bin/activate && python3 manage.py makemigrations --noinput"
    leader_only: true
  02_migrate:
    command: "source /var/app/venv/*/bin/activate && python3 manage.py migrate --noinput"
    leader_only: true
  03_superuser:
    command: "source /var/app/venv/*/bin/activate && python3 manage.py createsu"
    leader_only: true
  04_collectstatic:
    command: "source /var/app/venv/*/bin/activate && python3 manage.py collectstatic --noinput"
    leader_only: true
    05_syncstripeproduct:
    command: "source /var/app/venv/*/bin/activate && python3 manage.py djstripe_sync_models Product"
    leader_only: true
  06_syncstripeprice:
    command: "source /var/app/venv/*/bin/activate && python3 manage.py djstripe_sync_models Price"
    leader_only: true
Commit the changes to git and deploy:
$ git add . $ git commit -m "updates for eb"

$ eb deploy
Now we should have static files and media files served from S3, RDS should be connected as our database and stripe data should be synced to our RDS db.